Showing posts with label How To. Show all posts

Wednesday, 3 February 2016

How To // I ♥ U 3D Card

I always think handmade cards are the best - but Valentine's Day can be a tricky one. I have a simple Valentines Day Card idea which is super cute & "cool" (for those that are in new relations & don't want to seem too clingy/loved up)! 


To make your card you all need:
  • White Card
  • Coloured/Patterned Card 
  • Craft knife (with a cutting matt)
  • Glue
  • Pencil & Rubber

I obviously stumbled across the idea on Pinterest & after much searching, I managed to find the perfect printable template. Once you have printed your template & cut it out....

  1. Use your pencil to carefully draw around your template on to the white card, remembering to mark which lines to fold & which ones to cut. 
  2. Using your craft knife (& cutting matt) cut along the correct lines. 
  3. Gently fold along the correct lines to create a 3D/Pop-up effect.
  4. Very carefully rub out any pencil lines that may be showing, taking care not to rip the card.
  5.  Once you are happy with the way it looks, glue the back of the white card & carefully stick it to the patterned card (it is easier to do this if you fold both cards in half first & stick down one half at a time)
....and you're done! 


I'm sure you'll agree it is really quite simple & looks really cute! If you do have a go yourself, please share with me on Twitter or Facebook.

♥ 
ZoFlo

Sunday, 9 August 2015

How To // Fabric Pinboard

This is a How To post I have been meaning to do for a while so I am really excited to finally share it with you - it is probably my favourite one by far. I really needed a Pinboard for my craft room, but wanted something a little more exciting (pretty) than a standard one, so I rummaged through my fabric stash & sewing box to see what I could use. Here is a list of what I used to make my Fabric Pinboard:
  • Pinboard (any size you like)
  • Fabric of your choice (enough to cover your pinboard)
  • Purple Ribbon
  • Staple Gun
  • Fabric Scissors
  • Decorative Pegs


  1.  Lay the Pinboard on top of the fabric & measure 3 inches around the edge. Cut out the fabric using nice, sharp fabric scissors.
  2. Lay the Pinboard face down on the wrong side of the fabric & starting with one side, pull the fabric nice & tight before using the staple gun to secure. Start in the middle & work your way out. Once you have completed the first side, move on to the opposite side next followed by the other two sides.
  3. I had some spare fabric so I used it to make a little pouch at the bottom by folding the fabric (to create a nice clean edge) & pulling tight & stapling to the back of the pinboard.
  4. I stapled some purple ribbon so it ran along the top of the pinboard too, so I could use the decorative pegs.


Humphrey Getting Involved!

 And that's it. This is such a simple How To but looks so great. And you can use any fabric you like & any sized Pinboard! I picked up some Giant Push Pins from Tesco which are a lush addition too (although they leave quite a big hole in the fabric so I would recommend always using the same hole for the pin!!!).


What do you think? If you have a go at this one, please share your photos on my Facebook page or you can Tweet me. I love seeing peoples makes!

♥  
ZoFlo


Sunday, 21 June 2015

How To // Decoupage Candle Holder

So I had a free morning yesterday, but didn't feel like taking on anything too big (I have another foot stall & 2 chairs that need upholstering but I really wasn't in the mood yesterday) so thought it would be the perfect time to do a bit of decoupage. Its easy, not too messy & actually quite theraputic. I chose to make my own Candle Holder & thought I would share it with you all as I was really pleased with it. You will need:
  • Old Jar (I soaked mine in hot water to get the label off)
  • Decoupage Glue
  • Brush
  • Decoupage Paper - in a pattern/colour of your choice
  • Candle
  • Ribbon/Bow to decorate (optional)


Make sure you have removed the label from the jar & it is completely dry before you begin.
  1.  Tear up your decoupage paper into small pieces, depending on the effect you want to create. I was happy with doing it completely random so just did small, stamp sized squares. But you could do long strips the length of the jar to keep the pattern on the jar similar to the pattern on the paper.
  2. Put a thin layer of glue onto the jar covering only the area you want to cover. Dab the piece of paper you want to put onto the jar with the brush & stick to the gluey area. Cover with a thin layer of glue.
  3. Continue with this, doing small sections at a time, until you have covered the whole of the jar. 
  4. Leave to dry for 1-2 hours. Tie the ribbon/bow to the top of the jar, for extra decoration.
  5. Pop the candle inside & you're done!

Tip: You don't have to stick to one piece of decoupage paper. Mix it up! Use lots of different colours/patterns to create bold designs!

 This is definitely one of the most simple How To post so I do apologise but I thought it was such a cute idea & some people haven't done decoupage before. I certainly hadn't until I went to the Creative Crafts Show, where I got all of the bits needed to give it a go for myself. It is a lovely little hobby especially if you don't have much time on your hands or even if you have little ones as they can join in too! Also, you can literally decoupage anything....

♥  
ZoFlo


Sunday, 14 June 2015

Sunday Baking // 101 Things in 1001 Days #97

Learn to bake Lemon & Poppyseed Muffins

These are my absolute favourites & I have never made them before (I'm not sure why)! I really wanted to make ones with Lemon Curd in the middle - like the ones in Costa - so I used a Lemon Curd Muffin Recipe but made a few adaptations. I was actually really pleased with how they turned out & will definitely be making them again. This is how I made these little lemony treats...

  • 200g Self-Raising Flour
  • 100g Caster Sugar
  • 1 Large Egg
  • 75ml Olive Oil/Vegetable Oil
  • 150ml Milk
  • 1 Lemon
  • Poppy Seeds
  • 12 Tsp Lemon Curd


  1. Heat the oven to 190°C and line a muffin tin with 12 paper cases
  2. Sieve the Flour into a bowl & mix in the Sugar
  3. In a separate bowl, thoroughly mix the Egg, Olive Oil & Milk together.
  4. Slowly add this mixture to the Flour & Sugar, stirring well to ensure the wet & dry mixtured as thoroughly mixed together.
  5. Add in the zest & juice of one lemon & the Poppy Seeds (you can you as many as you like, but you really don't need too many at all).
  6. Half fill the paper cases with the mixture & then add 1tsp of lemon curd to the middle of each muffin. Use the remaining mixture to fill up the paper cases.
  7. Carefully place into the preheated oven, being sure that you don't slam the oven door. Bake for 15-20 minutes until rises & firm (I couldn't really get mine to go golden brown like usual cakes, but I can assure you they are definitely cooked enough)


Let me know if you give this recipe a go, I would love to see how yours turn out. They are so yummy & easy to make too. I can't believe I haven't attempted these ones sooner! And it's another thing ticked off my 101 Things...

♥  
ZoFlo

Sunday, 7 June 2015

How To // Chalkboard Plant Pots

If you Like my Facebook Page you may have noticed that last month I picked up a small pot of Blackboard Paint from Wilko. I had been meaning to get some for a while as I had a few project ideas in the pipeline, one of which being to jazz up some old plant pots we have in the Garden. Since moving out of my parents home, I have become more aware of the cost of things as well as having to prioritise my money. Meaning I have to spend more on Bills, Food & Petrol & less on fun things like Clothes, Make-up & apparently new plant pots!!

The only thing I dislike about some of our plant pots are the colours, other than that they are fine. So it seemed a shame to get rid of them when they were in perfectly fine condition. I have seen in a few places Chalkboard Plant Pots which are super cute but they always seem to be quite pricey. So obviously I thought the cheaper option would be to make my own & thought it was only fair to share this idea with you all. You will need:
  • Plant Pot
  • Blackboard Paint
  • Paint Brush
  • Chalk
  • Wire brush / Sandpaper (if required)
  1. Prep your painting area - as it was a nice day, I did my painting outside (this also helped the paint to dry quicker too). I still put down a dust sheet or two though as Blackboard Paint on the Decking is not okay...
  2. Make sure your chosen plant pot is clean - give it a good wipe over with a damp cloth, getting rid of any dirty bits. Also if there is any old paint chipping off, get rid of this too. I used a wire brush to get all the old paint off but you could use sandpaper.
  3. Get painting! Don't apply the paint too thickly, otherwise you may end up with drip marks. I also did two coats, just to be sure that everything was nicely covered!
  4. Once the paint has completely dried, you can use the Chalk to do whatever you like - I wrote the names of my plants on mine. I also like the idea of letting the little ones go crazy with the Chalk Pens & doing their own design for you.


And that's it - super easy & cheap. Definitely beats paying high end prices for something so simple that you can create yourself at home! What other things have you done with Blackboard Paint?
♥  
ZoFlo

Sunday, 17 May 2015

How To // DIY Shirt

I have two or three shirts which I really love but I never wear. I could never put my finger on why I never wore them - I would often try them on & just decide they didn't "look right". But I really like them so didn't have the heart to get rid of them. I decide to have a play with one of them; change it up a little bit so I would wear it. I decide on making it 3/4 length sleeves & thought I would share a post on this, so hopefully you will be inspired to give it a go too!


So to make your long sleeved shirt / t-shirt / jacket into 3/4 length sleeves you will need to...
  1. Sounds obviously, but actually put the garment on! I can't even stress how important this is - don't go guessing how short you want it as you will get it wrong. I promise you (as I have done this before). 
  2. Use safety pins to mark where you want to cut it. Don't forget to include a 1.5inch seam allowance too. Take the garment off & lay on a flat surface so you can cut the sleeves straight. If you have pinking shears, it would be great to use these, especially if you're fabric is prone to fraying. But if not, standard dress making scissors will do just fine.
  3. Turn the garment inside out & turn up the end of the sleeves twice, to create a neat, equal hem on both sides. Pin in place. At this point, I folded my shirt in half, to make sure the sleeves were the same length on both sides. You could attempted to try it on, but it could be painful with the pins stuck in it.
  4. Finally, carefully stitch the hem in place. You could handsew, but I would recommend using a machine as it'll make it more secure & is more likely to last. Don't forget to use a cotton that matches the colour of your garment.

Ta Da! You're done! It's only a small change but it's surprising what a big different it makes! I am definitely going to try this with the rest of my shirts! I used my rhinestone applicator to add some gems to the collar too, which worked really well! Do you ever do any DIY on your clothes? It's a great way to add new life to an old item of clothing that you don't want to get rid of!

♥  
ZoFlo

Monday, 6 April 2015

Smoothie Making // Tooty Frooty

 For a little while I have wanted to invest in a smoothie maker as I think they are an easy & healthy option for breakfast / post workout treat. Also our blender has had it's day really. I haven't attempted to make a smoothie in a long time so thought I would have a go, as a little practice run before commiting to a smoothy maker! It was so yummy that I thought I would share my Tooty Frooty Smoothie Recipe with you!


 2 x Strawberries (large ones & 2 extra for decoration if you like)
150g of Blueberries
1 x Kiwi (peeled, of course)
3 x Petits Filous (I used Raspberry ones but don't think it matters too much)

I literally chopped it all up and chucked it in. That was enough to make two small smoothies...as I had to share it with Nick...but it would probably be enough for one on its own. Do you have any yummy smoothie recipes?

♥  
ZoFlo


Saturday, 28 March 2015

How to Make // Pom Pom

For some people this may be the simplest thing EVER! But I overheard a girl in Hobbycraft the other day asking her Mum how to make a Pom Pom! WHAT? I think my whole childhood was spent making Pom Poms, so for those of you who don't know and want something fun & easy to do with the little ones, then here is how...


1. Cut two rings out of card, making sure they are the same size. You can do these any size you like - obviously the bigger the ring, the bigger your Pom Pom. 
2. Tie the end of your chosen wool to the rings (tying them together) and begin wrapping your wool through the middle hole and around the ring. 
3. Once you have finished wrapping your wool around the rings, cut down the middle of your wool. It's easiest to make a little opening at the top and pull apart the two rings so you can use them as a cutting guide. 
4. Cut yourself a length of wool and tied it tightly down the middle of the two cardboard rings. 
5. Finally, cut the cardboard rings and pull then away from the wool - here is your Pom Pom! You can neaten it up by cutting any extra long pieces off. 

What do you think? It is such an easy activity for all ages (and cheap as well!). If you want to get super good, you can make Pom Pom Animals - I haven't quite mastered this yet - but you can search Pinterest for ideas!

♥  
ZoFlo

Sunday, 15 March 2015

Sunday Baking // Mothers Day Chocolate Cake

Happy Mothers Day to all of the fabulous Mummas in the world! Every year my Mum says "I don't want anything, don't spend too much..". Typical Mum! So this year I decided to bake for her instead! I had seen an idea on Pinterest ages ago & loved it. I have been trying to think of an opportunity to make it & thought it looked perfect for Mother's Day! The sponge is just a standard chocolate sponge with chocolate butter icing. The decorating part used up quite abit of chocolate. I used: 

9 kit kats (broken in half)
Half a bag of giant buttons
Half a bag of white chocolate buttons
A few Mintrels (if you like)


And this was the finished product...! I am so pleased with it & so was my Mum. Makes a nice change as usually me & my Sisters all opt for Flowers / Vouchers / Chocolates so my Mum ends up with the same thing every year, 3 times!! Did you do any baking for your Mum?

♥  
ZoFlo

Sunday, 1 March 2015

Sunday Baking // Rolo Cupcakes

My first baking post for 2015! Wow, it's been a while. This weekend I had a lot of time to myself - very rare - so I decided to do some baking. I have been dying to use my Tala Piping Set which I got for Christmas so chose something with plenty of butter icing!  I took to Pinterest to research some ideas as I wanted to make something new that I haven't done before. I stumble across Rolo Cupcakes & they looked so delicious I just had to give them a go. I didn't follow any particular recipe, I just kind of improvised & made up my own. Here are my list of ingredients (makes 12 cupcakes):

Self Raising Flour - 100g
Butter - 185g (125g for the Sponge, 60g for the Icing)
Caster Sugar - 125g
Eggs - 2
Cocoa Powder - 25g
Chocolate Chips
Caramel 
Icing Sugar - 60g
Rolos - 2 packets


I mixed everything together as if you were making standard chocolate cupcakes & added in a bag of chocolate chips at the end. I cooked them in the oven on 180 degrees (fan oven) for 20-25 minutes. Once they were completely cool, I cut out a small part of the Middle of the cake & added in a tsp of Caramel. I popped the sponge back on top - this doesn't have to be neat as the butter icing covers it. For the butter icing, I used 60g of Butter, 60g of Icing Sugar & 2tbsp of Cocoa Powder. I used my Tala Piping bag to pipe the icing on top (using head #30) & then added a Rolo to finish it off. 


I am so pleased with the way they have turned out & they look & taste so yummy - what do you think? Have you baked anything new recently?

♥  
ZoFlo

P.S. Don't forget, you can now like my page on Facebook now!

Sunday, 8 February 2015

How to Make // Felt Love Heart

I was playing around in my sewing room a little while back with some left over material I had laying around. I ended up making this cute little hanging love heart & decided to share it with you all.


To make this Love Heart you will need:

Felt (this could be any colour you like, but I chose red)
Floral Fabric (again, any colour you like)
White ribbon
Needle & Thread (white, black & colour to match material)

  1. Draw yourself a heart shaped template and pin to your floral material. Cut out fabric.
  2. Pin the same template to your felt but this time cut about 1/2 an inch away from the template, so you can create a nice, felt border on your finished heart.
  3. Pin the two pieces of material together & sew - I chose to hand sew as the one I made was quite small, but if you have decided to make a bigger one you can machine sew.
  4. Cut a small piece of the white ribbon off and hand sew "love" onto it, keeping it as central as possible.
  5. Carefully hand sew this piece of ribbon to the heart - again keeping it central.
  6. Finish by creating a loop with a piece of the ribbon and sewing to the back of the heart.

 If you have had a go at this, I would love to see. Send me a photo of it on Twitter or put a link in the comments box below. You could do it using any word really & it could make a lovely gift for a Mum, Sister or Best Friend!

♥  
ZoFlo

Sunday, 23 November 2014

Sunday Baking // Dainty Lemon Cakes

I realised that it has been a little while since I have uploaded a Sunday Baking post - August to be precise - so I thought it was about time I uploaded another baking creation! I decided on Dainty Lemon Cakes, a recipe from my Bake-a-Boo cook book.


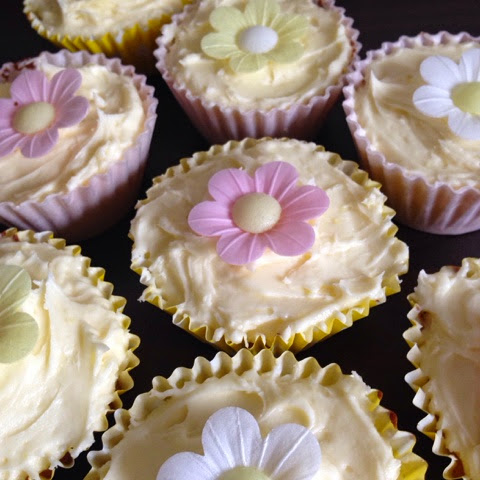
The recipe says it makes 20 mini cupcakes, however I didn't have any mini cases (and when I went shopping for the ingredients I found Edible Cupcake Cases...could not resist), so I made 8 normal size cupcakes topped with plenty of lemon butter icing. YUMMY! They were really simple to make, just a standard cake mixture with some lemon zest & juice added. I did put more lemon juice in than the recipe states as I like the flavours to be a little more obvious. What do you think? I love the edible wafer flowers too, they add a cute, girly touch!


Have you done any baking recently? If you have any recipes you would recommend, please let me know in the comments box below.

♥  
ZoFlo

Sunday, 19 October 2014

How To Make // Christmas Bunting


I am sure half of you are thinking "it's too soon" whilst the other half are thinking "it's never too soon"! I'm afraid I am with the latter as I am so excited for Christmas this year! So you can imagine my delight when the October issue of Sew arrived through the post filled with Christmas themed ideas and free Christmas fabric! There was a selection of 4 projects & I was immediately drawn to the Christmas "Mitten" Bunting as I thought it was so cute and unusual. It was really simple to make and such a fantastic idea that I had to share it with you all...

To make the Christmas Bunting you will need:

2 contrasting (Christmas appropriate) fabrics
6 Buttons
Red & White Twine
White Thread
Iron
Sewing Machine (although you could hand sew if you prefer)

  1. I began by tracing the mitten template in the Sew Magazine (October Issues), but if you don't have this, then I am sure you could find one online or make your own. I then cut out 12 mittens shapes, which will eventually make 6 mittens (3 in each fabric).Be sure to cut your fabric correctly if it is patterned, so the pattern is running in the correct direction.
  2. Pin the mittens together, right sides facing, and sew together, leaving the bottom (straight edge) unsewn. Turn them the right way out and iron to create your perfect mitten.
  3. I then cut out six 3.5cm x 11cm cuffs, 3 from one fabric & 3 from the other. Fold over 6mm at each short edge & iron to press in place. Do the same with the long edges.
  4. Fold the cuff in half and place over the top of the contrasting mitten. Make sure the fold is on the same side on each mitten (so mine is on the opposite side to the thumb).
  5. Sew on the buttons - again, making sure these are on the same side on each mitten.
  6. Hand stitch each mitten to the twine, keeping the spacing between each one the same.

What do you think? I thought they were super easy and so cute! I just can't wait until the festive season properly begins so I can put them up in the house! Check out the Sew website to see what other sewing projects they have. I'm sure (I hope) they will have plenty of Christmas ones soon!

If you have made these, or anything similar, please let me know in the comments box below.

♥  
ZoFlo


Sunday, 10 August 2014

Sunday Baking // Raspberry & Chocolate Chip Traybake


Sorry I have been so absent recently - adusting to working life is hard & I have been so busy most weekends with various events & family days out! But this weekend I have had nothing to do & it has been amazing! Sometimes the best weekends are the ones where you can just do as you please. So on this rotten, wet & windy Sunday, I decided to bake!

What with the new series of the Great British Bake Off, I felt it was only right to join in and attempt a recipe I have been eyeing up for months! I found this one in a home magazine & seeing something that involved chocolate & raspberries, I was immediately excited!


I am usually rubbish at following recipes but all of the ingredients were really simple (nothing too exotic / pricey) and the recipe was easy too!


What do you think? Have you done any Sunday baking recently? I would love for you to share your recipes so I can try them out too.

♥  
ZoFlo

Tuesday, 8 April 2014

How to Make // Mini Owl


  So I have decided to start my new blog with a slightly easier craft project. I made these little cuties for a Craft Sale a while back and as soon as I shown my Mum and Sisters they fell in love. So needless to say I have made these countless times! Originally, they were from a "Make Your Own Owl" set I was given as a gift. I believe it was from Tiger (the best store) but this was over a year ago now so I'm not sure if they still have them. They were so cute and easy to make, so I made sure I made a template so I could make them again - and here is how...

To make these Mini Owls you will need:

 4 different coloured felt squares (white, black, cream & a colour of your choice)
1 square of floral cotton fabric of your choice
2 black buttons
Toy stuffing 
Lots of thread!

  1.  Begin by sewing the two small white felt circles to the head section to create eyes, adding on the two black buttons to the centre of the circles. Attach a small brown felt triangle to make the beak.
  2.  Next, attach the floral cotton fabric to one section of the main body to create a "tummy". Sew the small white heart onto the bottom left corner, overlapping the floral fabric slightly.
  3. Attach the head to the main body of the Owl - I did this by sewing underneath the beak to hide the stitches. Only attach it in the centre of the head so that you are able to lift the sides of the head when sewing the 2 main body sections together.
  4. Sew the 2 floral cotton fabric wing shapes to the 2 felt wing shapes.
  5. Sew the back main body section to the front main body section, attaching the wings as you go. Dont forget to leave a small gap at the end so you can fill you owl with toy stuffing.

 Hopefully these instructions made sense and will be helpful - I didn't realise how hard it would be to explain how to make something so simple! This is only the way I decided to make them, but you can make them in any way you would prefer - that's all part of the fun of making things yourself. I have previously used beautiful red, heart-shaped buttons instead of a white felt heart. So cute. I have also attached ribbon to the top of each Owl before (when sewing up the main body, add in the ribbon as you sew) so that it can be hung up wherever you please.

Let me know what you think in the comments box below. And if you have had a go at making one I would love to hear from you too!

♥  
ZoFlo